

Why Building a Shopify App Could Be Your Most Profitable Move Yet
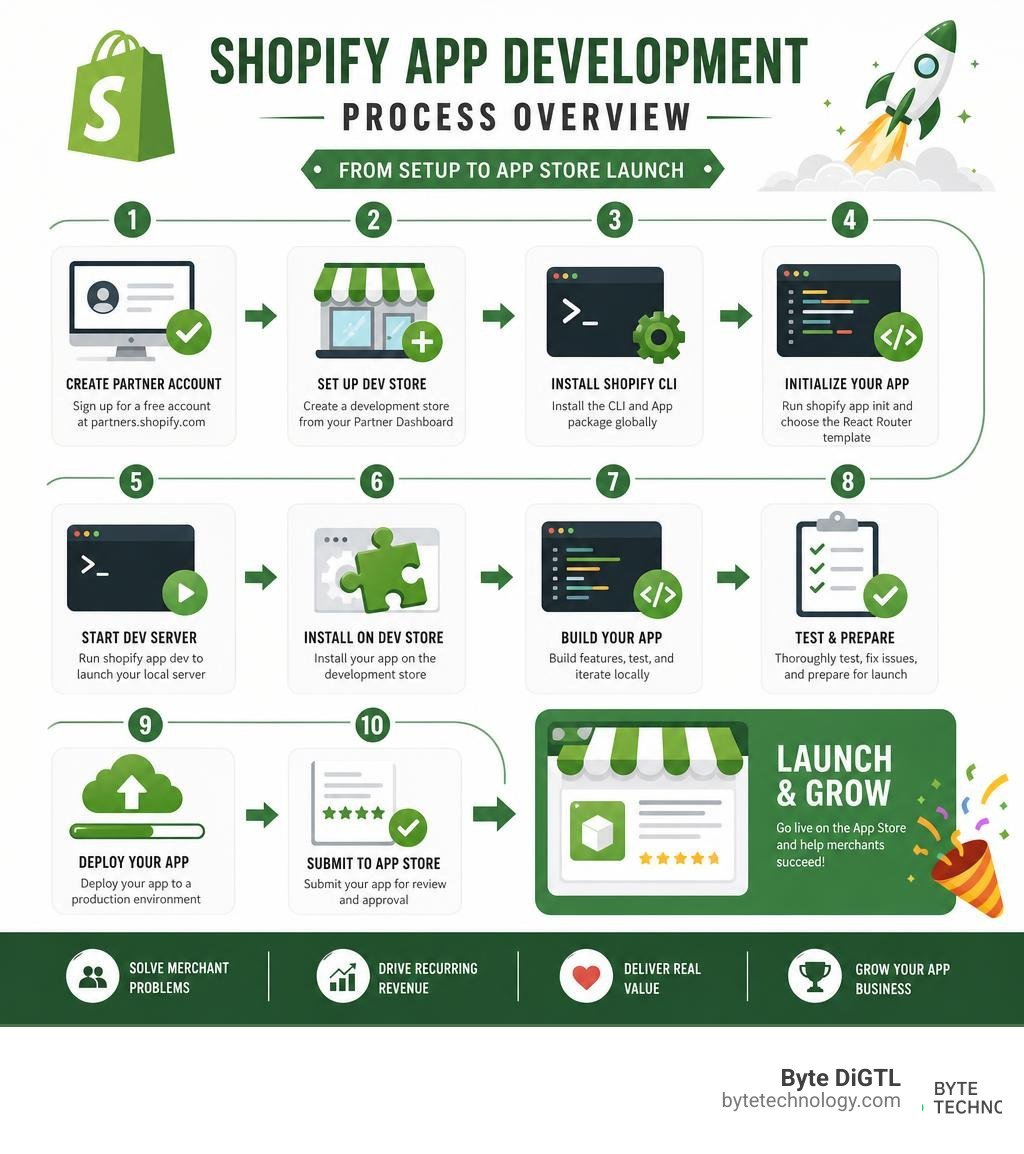
If you want to make a Shopify app, here is the fastest path to get started:
- Create a free Shopify Partner account at partners.shopify.com
- Set up a development store from your Partner Dashboard
- Install Shopify CLI with
npm install -g @shopify/cli @shopify/app - Run
shopify app initand select the React Router template - Run
shopify app devto launch your local development server - Install the app on your dev store and start building
Shopify powers over 4 million active stores worldwide, and 87% of those merchants rely on apps to run their businesses day to day. The average store installs six apps. That is not a niche market. That is a massive, built-in audience actively looking for solutions.
The economics are hard to ignore. App developers have collectively earned more than $1.5 billion through the Shopify App Store. Shopify takes zero revenue share on your first $1 million in annual app revenue, then just 15% beyond that. Top developers earn $167,000 or more per year.
And the tooling has never been better. In 2026, Shopify CLI can scaffold a production-ready app in under two minutes. The ecosystem is mature, well-documented, and designed to let small teams move fast.
Whether you are a solo developer, a small agency, or a business owner with a specific problem to solve, building a Shopify app is one of the most direct ways to create recurring value in the e-commerce space.
BYTE DiGTL brings over a decade of experience in scalable web architecture and e-commerce development, including hands-on work helping brands navigate what it takes to make a Shopify app that performs in production. In the sections ahead, we will walk you through every step, from setup to launch.
Handy make shopify app terms:
Why You Should Make Shopify App Development Your Next Big Project
When you decide to make a Shopify app, you are entering a thriving software ecosystem that supports millions of merchants globally. But before you write your first line of code, you must understand the different types of apps you can build and how they integrate with Shopify. Choosing the right architecture from day one will save you weeks of refactoring later.
Shopify classifies apps based on how they are distributed and how they look to the merchant. According to the official documentation on About apps – Shopify Help Center, the primary distinction lies in who can install your app and where its user interface lives.
Public Apps
These are the apps you see listed on the Shopify App Store. They undergo a rigorous 100 checkpoint review process before approval. Public apps can be installed by any merchant, making them the best choice if you want to build a Software as a Service (SaaS) business. They can be listed (searchable by anyone) or unlisted (accessible only via a direct link).
Custom Apps
If you are building a bespoke solution for a single merchant, a custom app is the way to go. Custom apps are created in the merchant’s Shopify admin or via the Developer Dashboard and do not require Shopify App Store review. They are perfect for internal business logic, ERP integrations, or highly specific store features.
Embedded Apps
An embedded app loads directly inside the Shopify admin using an iframe. By utilizing Shopify App Bridge and Polaris components, your app looks and feels like a native part of the Shopify interface. This provides a seamless user experience for merchants who do not want to leave their dashboard to manage your app.
Extension-Only Apps
For simpler integrations that do not require a separate backend or a complex user interface, Shopify offers extension-only apps. These apps use Admin UI extensions to inject basic functionality directly into existing Shopify admin pages, such as adding a custom action button on the product details page.
To help you choose the right path, we have outlined the core differences in the table below:
| App Type | Distribution Method | Ideal Use Case | UI Integration | Review Required? |
|---|---|---|---|---|
| Public App | Shopify App Store | Commercial SaaS products | Embedded (App Bridge) | Yes (Strict review) |
| Custom App | Direct install link | Single-store bespoke integrations | Embedded or standalone | No |
| Extension-Only | App Store or Custom | Simple admin UI tweaks | Native UI blocks | Yes (if public) |
Understanding these distinctions is crucial, especially when you are learning how to create shopify plugin architectures that scale. At Byte DiGTL, with our local teams across Denver, CO, Minneapolis, MN, and Dallas, TX, we consistently help clients evaluate which architecture fits their long term business goals.
Setting Up Your Environment and Scaffolding Your App
Now that you have selected the right app type, it is time to set up your development environment. Shopify has spent years refining its developer experience, making it incredibly straightforward to go from a blank folder to a running app. To get started, you will need to follow the official guidelines to Scaffold an app.
Prerequisites to Make Shopify App Projects Successful
Before running any CLI commands, ensure you have the following accounts and tools ready:
- Shopify Partner Account: Go to partners.shopify.com and sign up for a free Partner account. This dashboard is where you will manage your apps, track earnings, and create development stores.
- Development Store: Inside your Partner Dashboard, create a development store. This is a sandboxed Shopify environment where you can safely install and test your app. If you plan to test checkout extensions, make sure to choose a Developer Preview store.
- Node.js: Ensure you have Node.js version 18 or higher installed on your local machine.
- Shopify CLI: The Shopify CLI is the command center of your development workflow. It handles authentication, local hosting tunnels, and production deployments.
As highlighted in the guide on How to Create a Shopify App From Scratch (2026) | Step-by… | Talk Shop, having these prerequisites configured correctly prevents common environment mismatches that can stall your project early on.
Using Shopify CLI to Make Shopify App Scaffolding Easy
With your prerequisites in place, open your terminal and navigate to the directory where you want to keep your project. Run the command to initialize a new app:
shopify app init
The CLI will prompt you to name your app and select a project template. The recommended template for most developers is the React Router or Remix template. This template comes pre-configured with React on the frontend, Node.js on the backend, and Prisma as the database ORM.
Once the setup process finishes, navigate into your newly created app directory. To start your local development server, run the following command:
shopify app dev
When you run this command, the Shopify CLI performs several actions behind the scenes:
- It prompts you to log into your Partner Account.
- It links your local code to an app entry in your Partner Dashboard.
- It starts a local development server.
- It automatically creates a secure tunnel using Cloudflare, giving you a public HTTPS URL for local testing.
- It creates a local SQLite database using Prisma.
Press “p” in your terminal to open the preview URL in your browser. This will prompt you to install your newly scaffolded app on your development store. Once installed, you will see the default dashboard, which includes a button to generate test products. This confirms that your app is successfully communicating with your store. For more details on customizing this initial setup, refer to the official Shopify Build documentation.
Authentication, Session Storage, and the GraphQL Admin API
Behind every great Shopify app is a secure authentication flow and a robust data layer. Understanding how Shopify handles security and how to query store data efficiently is essential when you make a Shopify app.
Shopify uses OAuth 2.0 to authenticate apps and grant them access to store resources. When a merchant installs your app, they are redirected to Shopify to approve the permissions, or scopes, your app requires. These scopes are defined in your shopify.app.toml configuration file. Once approved, Shopify sends an authorization code back to your app, which your server exchanges for a permanent offline access token.
The scaffolded React Router template handles this entire OAuth flow for you out of the box. It uses Prisma session storage to securely save these access tokens in your database, associating them with the specific shop domain.
With the session securely stored, you can begin making authenticated requests to Shopify’s APIs. While Shopify still supports a REST API, the GraphQL Admin API is the modern standard and is highly recommended for all new apps. GraphQL allows you to request exactly the data you need in a single round trip, avoiding the over-fetching issues common with REST.

When working with the GraphQL Admin API, you must keep Shopify’s rate limits in mind. Shopify uses a leaky bucket algorithm to regulate API traffic. Your app is allocated a rate limit budget of 1,000 points, or 2,000 points for Shopify Plus stores, which refills at a rate of 50 points per second. Each GraphQL query has an associated cost based on the complexity and depth of the requested data.
For a deep dive into setting up secure middleware and managing your GraphQL calls, the tutorial on Shopify App Development with Node.js: Complete Guide for 2025 is an excellent resource.
If you are building advanced targeting or marketing tools, you will also want to read The Ultimate Guide to Shopify’s Customer Segmentation Tool: Stop Blasting, Start Targeting to understand how to leverage Shopify’s native segmentation queries via the GraphQL API.
Designing the Frontend with Polaris and App Bridge
A successful Shopify app must feel like a natural extension of the Shopify admin. If your app looks like a completely different website, merchants will struggle to trust it and find it difficult to navigate.
To solve this, Shopify provides Polaris, a comprehensive design system and component library. Polaris includes everything from basic buttons and cards to complex data tables and resource pickers. When you use Polaris React components, your frontend automatically matches the typography, colors, and layout of the Shopify admin.
However, Polaris only handles the visual presentation. To make your app truly interactive within the Shopify frame, you need Shopify App Bridge. App Bridge is a JavaScript library that allows your embedded iframe app to communicate directly with the host Shopify admin.
With App Bridge, you can:
- Trigger native toast notifications.
- Open native modal dialogs.
- Update the breadcrumbs and title bar of the active admin page.
- Display a contextual save bar that alerts merchants when they have unsaved changes.
By combining Polaris and App Bridge, you create a seamless user experience where the merchant cannot even tell they are using a third party application. If you want your app to stand out and convert free trial users into paying subscribers, investing in your UI design is critical. For professional guidance on creating stunning, native feeling layouts, you can explore our insights on Why You Need a Shopify Web Designer.
Handling Webhooks, Extensions, and Production Deployment
To build an app that reacts to store events in real time, you must implement webhooks. Webhooks are HTTPS POST requests that Shopify sends to your app server whenever a specific event occurs, such as a new order being created or a product being updated.
When you make a Shopify app, registering webhooks can be done directly in your shopify.app.toml file. For security, you must always verify the HMAC signature included in the headers of every incoming webhook request. This ensures the payload actually came from Shopify and not a malicious third party.
Additionally, if you plan to publish your app on the Shopify App Store, you must implement the three mandatory GDPR webhooks:
- CUSTOMERSDATAREQUEST: Triggered when a customer requests their personal data from the merchant.
- CUSTOMERS_REDACT: Triggered when a merchant requests that a customer’s personal data be deleted.
- SHOP_REDACT: Triggered 48 hours after a merchant uninstalls your app, signaling you to delete their shop data from your database.
Beyond the admin panel, you can extend your app’s functionality into the storefront and checkout using app extensions.
Theme app extensions allow you to inject HTML, CSS, and JS directly into a merchant’s theme using Liquid template blocks, completely eliminating the need to edit theme code manually. Checkout UI extensions let you add custom fields or promotions directly to the checkout page, which is invaluable for apps handling alternative payment configurations or custom offers. To see how these elements integrate with popular payment setups, check out The Ultimate Shopify Afterpay Setup Guide.
When you are ready to launch, you must deploy your app to a production hosting environment. Popular choices for Node.js and Remix apps include Render, Railway, and Fly.io. You will need to set up a production PostgreSQL or MySQL database, update your environment variables with your production API keys, and update your App URLs in your Shopify Partner Dashboard to point to your live HTTPS production domain.
Frequently Asked Questions about Shopify App Development
How long does it take to build a Shopify app?
The development timeline depends entirely on the complexity of your app. A simple custom app that performs basic automated tasks or updates product metafields can be built and tested in one to two weeks. A robust, public SaaS app featuring a complex React frontend, custom billing, multiple webhooks, and theme extensions typically takes four to twelve weeks of dedicated development and testing.
What are the mandatory GDPR webhooks?
Every production app on the Shopify App Store must register and handle three mandatory GDPR webhooks: CUSTOMERSDATAREQUEST, CUSTOMERSREDACT, and SHOPREDACT. Even if your app does not store or process personal customer data, you must still provide endpoints for these webhooks that return a 200 OK response to pass the Shopify App Store review.
How does Shopify app billing work?
Shopify provides a robust Billing API that handles all merchant transactions for you. You can offer free trials, one-time charges, monthly recurring subscriptions, or usage-based billing. Shopify collects the payments directly on your merchant invoice and payouts are managed through your Partner Dashboard. Best of all, Shopify charges 0% revenue share on your first $1 million in annual app earnings.
Conclusion
Learning how to make a Shopify app is one of the most rewarding developer journeys in the modern e-commerce landscape. By combining Shopify CLI, the React Router template, Polaris UI components, and the power of the GraphQL Admin API, you can build incredibly powerful tools that solve real problems for over 4 million merchants.
Whether you are launching a public SaaS app to generate recurring revenue or building a custom integration to streamline your own business operations, having an experienced partner makes all the difference. From our offices in Littleton, CO, Denver, CO, Monterey, CA, New York, NY, Minneapolis, MN, and Dallas, TX, our team at Byte DiGTL is here to help you turn your app ideas into scalable, high-performing realities.
Ready to build something amazing? Explore our specialized Shopify e-commerce Development services and let us help you make some Shopify app magic happen!